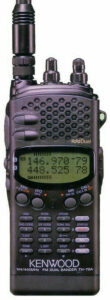
I bought a Kenwood TH-79A/D dual-band (2m/70cm) handheld (HT) ham radio from Ham Radio Outlet in San Diego back in 1995. It was a very advanced handheld for the time, compact, sturdy but not too lightweight and loaded with great features. A 5w output on 2m was pretty good, and the 3 or 4 watts on 70cm was also pretty good, and worked great in the Southern California area, as it is simply loaded with repeaters. I loved it. I took that thing with me all the time – on many hikes and even out while sailing.
This was my trusty friend for the next 5 years or so in San Diego and Newport, RI until I got orders to Japan. I packed it up carefully with most of my other ham gear while I spent the next two years stationed in Japan, or as my wife put it, as an occasional visitor to Japan between my shipboard periods underway. The little HT remained nestled in its original box in a warehouse in Rhode Island until I got back to the states in 2001. As luck would have it, I ended up in Rhode Island again, so the household goods we had in storage made a very short trip back to our new place, and I eagerly looked forward to getting active in Ham Radio again.
After unpacking all the gear and setting up my ham shack again, I discovered that the LCD on my little TH-79 was often quite dim and hard to read. A sharp tap or jostle would usually restore it to an acceptable level, but it was happening more and more often, and occasionally would vanish altogether. The same percussive maintenance would get it going again, until at last the day came when it was no longer working. The rig turned on and everything seemed to work fine, but there was nothing on the display and no amount of rapping and tapping brought it back to life.
At this point, I was pretty sure the cause was something loose inside the radio. I tried opening it and checking to see if anything was obviously loose or if there was evidence of any obviously failed components. I didn’t have the service manual or anything for instructions on how to take things apart, so was reluctant to dive in and completely disassemble it. At any rate, I took the three screws out of the back and separated the unit into front and back halves. I discovered a ribbon connector and a small 3 wire connector (power, I assumed) and a few exposed components, but not much more. I cleaned everything, hoping that was the issue. I even unseated the ribbon cable and cleaned its ends before reassembling.
Minor success! The display was working again, but was still dim and not reliable. I was able to use the radio for another couple of years before the display quit working again. By then it was time for me to transfer duty stations again, so I put the little guy away again and decided to tackle it more thoroughly later, after I had settled in my new location. I thought the issue was probably the ribbon cable.
I moved to Virginia and got settled in. My new job left me without much time for anything, or at least did not leave me much “non tired” time for things, so I left most of my ham gear packed up. I still used the Yaesu FT-5100 mobile in my truck for a while, but eventually even that got packed up when I bought a new vehicle. I was no longer an active ham – something I never thought would happen.
Fast forward a few (8!) years. I had retired from the Navy and had been comfortably established in a new job that left me with more time and energy for hobbies. Along with my engine and machine shop hobbies and my computer and electronic interests, I still had ham radio in the background. I decided to put a radio station back together, and strung a couple of antennas in the attic and hooked up my Kenwood TS-570. Ahh, the sweet sounds of a scrabbling DX pileup! I dove right back in to the hobby, and rediscovered my poor, broken little fellow, the TH-79, gently tucked away in the original box I had saved. Still not working, and now the battery was shot. No surprise, since the rig was now 17 years old, but I had the external power supply for it, so all was well. It was still a nice radio, and by all suppositions, everything worked but the LCD. I decided to try my hand at a more thorough repair.
By now, the service manual for the radio was widely available on the web for download, so I downloaded it to ease the mystery of how to really get into the radio without destroying it. I also searched and read as many accounts as I could of others having a problem with the LCD. Most discussed unsuccessful attempts to find something obviously NKR (not quite right) and to clean the ribbon cable contacts as I had done 10 years earlier. Finally, I found the key. Once the radio was really torn down to the point that the actual LCD module could be removed, the culprit was found.
The LCD, buried under the “A” unit in the front of the radio, is not connected by a hardwired
connection. Instead, the ribbon contacts on the edge of the display were connected to the “A” board by a “zebra strip
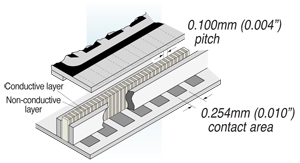
” (elastomeric conductor) – a tiny conductive strip made up of rubber with tiny laminated conductive layers sandwiched together across its length. Kind of like a really tall club sandwich on its side, with the bread slices and the meat (conductor) and cheese (dielectric) layers on edge. The edges of the conductive layers contact the PC board and transmit the signal across to the other edge of the zebra strip to the conductors in the display ribbon. That way, no hard wiring is required, and some misalignment can be tolerated. The only trick is, the PCB and LCD conductors must be clean, and the edges of the zebra strip need to be clean. And the strip needs to be compressed between the display and the PCB to maintain good, solid contact.
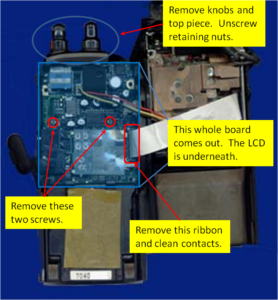
I read a few accounts discussing this issue – that the zebra strip had accumulated some goo and maybe corrosion over time and needed to be cleaned and re-seated between the board and the LCD, or that it had degraded over time and had shrunken to the point that good contact was no longer possible. The trick was getting to it. First, the “A” unit had to removed from the radio. Follow the instructions in the service manual. Then the LCD had to be removed. Also, follow the service manual. Here, you have to desolder the two side contacts of the display (probably power) from the bottom of the PCB. I recommend a solder sucker, but that may be because I have never been good with desoldering braid. The tabs were pretty easy to unsolder so that they were free. Then, carefully remove the LCD from the board by gently unsnapping the plastic corner clips, being careful not to lose the zebra strip from underneath or the two rubber connectors for the speaker. Turn the display over and look for the zebra strip if it is not still stuck to the PCB.
At this point, you are ready to clean things. I used denatured alcohol, but most recommendations are for simple isopropyl alcohol and clean, lint-free swabs. Clean the PCB pads, the LCD ribbon connectors and both sides of the zebra strip. Let them dry thoroughly, and do not handle them with bare fingers. I recommend using some clean tweezers. After things are dry, carefully replace the zebra strip in the channel in the LCD back so that it is in contact with the ribbon on the back of the display. Then, carefully put it back on the board, being very careful not to let the zebra slip or fall out of that position. If it gets out of place, you will have to remove the LCD again to re-align it for proper contact.
Once the LCD is snapped back in place, re-solder the two tabs on the front and carefully clean the LCD face so that no dirt or fingerprints remain before you put it back into the case. At this point, you are just reversing your actions from taking the unit apart. Put the “A” unit back into the front shell of the case and screw it in good and tight to make sure the zebra strip is firmly squeezed. Screw the nuts back onto the volume and channel selectors at the top, put the rubber boot back on, and replace the top piece. Reconnect the ribbon and power connectors, and put the two halves of the unit back together. Screw together.
Now power up. The display should be functioning again, assuming you have the zebra strip properly positioned and all the connectors replaced properly. It *is* possible to put the ribbon cable back in the wrong way up. I found that out for you.
I hope this helps somebody else. I’m sorry I did not take any photos while I had the radio open!


